Singularity is a container solution for computing: Singularity Website. Linux containers allow to encapsulate code within environment (librairies, compilers, etc.) in a portable image.
Previous tutorials: January 2018 in french, October 2018. See also the CC-IN2P3 presentation of January 2019 on Singularity.
Note on Singularity version:
-
2.4.6: April 2018;
-
2.6.1: December 2018 ⇒ LTS;
-
3.0.1: November 2018, new implementation of Singularity (in C and Go), new format of images (SIF), work with private GitLab Registry but don’t support the Singularity Hub.
| Singularity v2.6.1 will be used in this tutorial! |
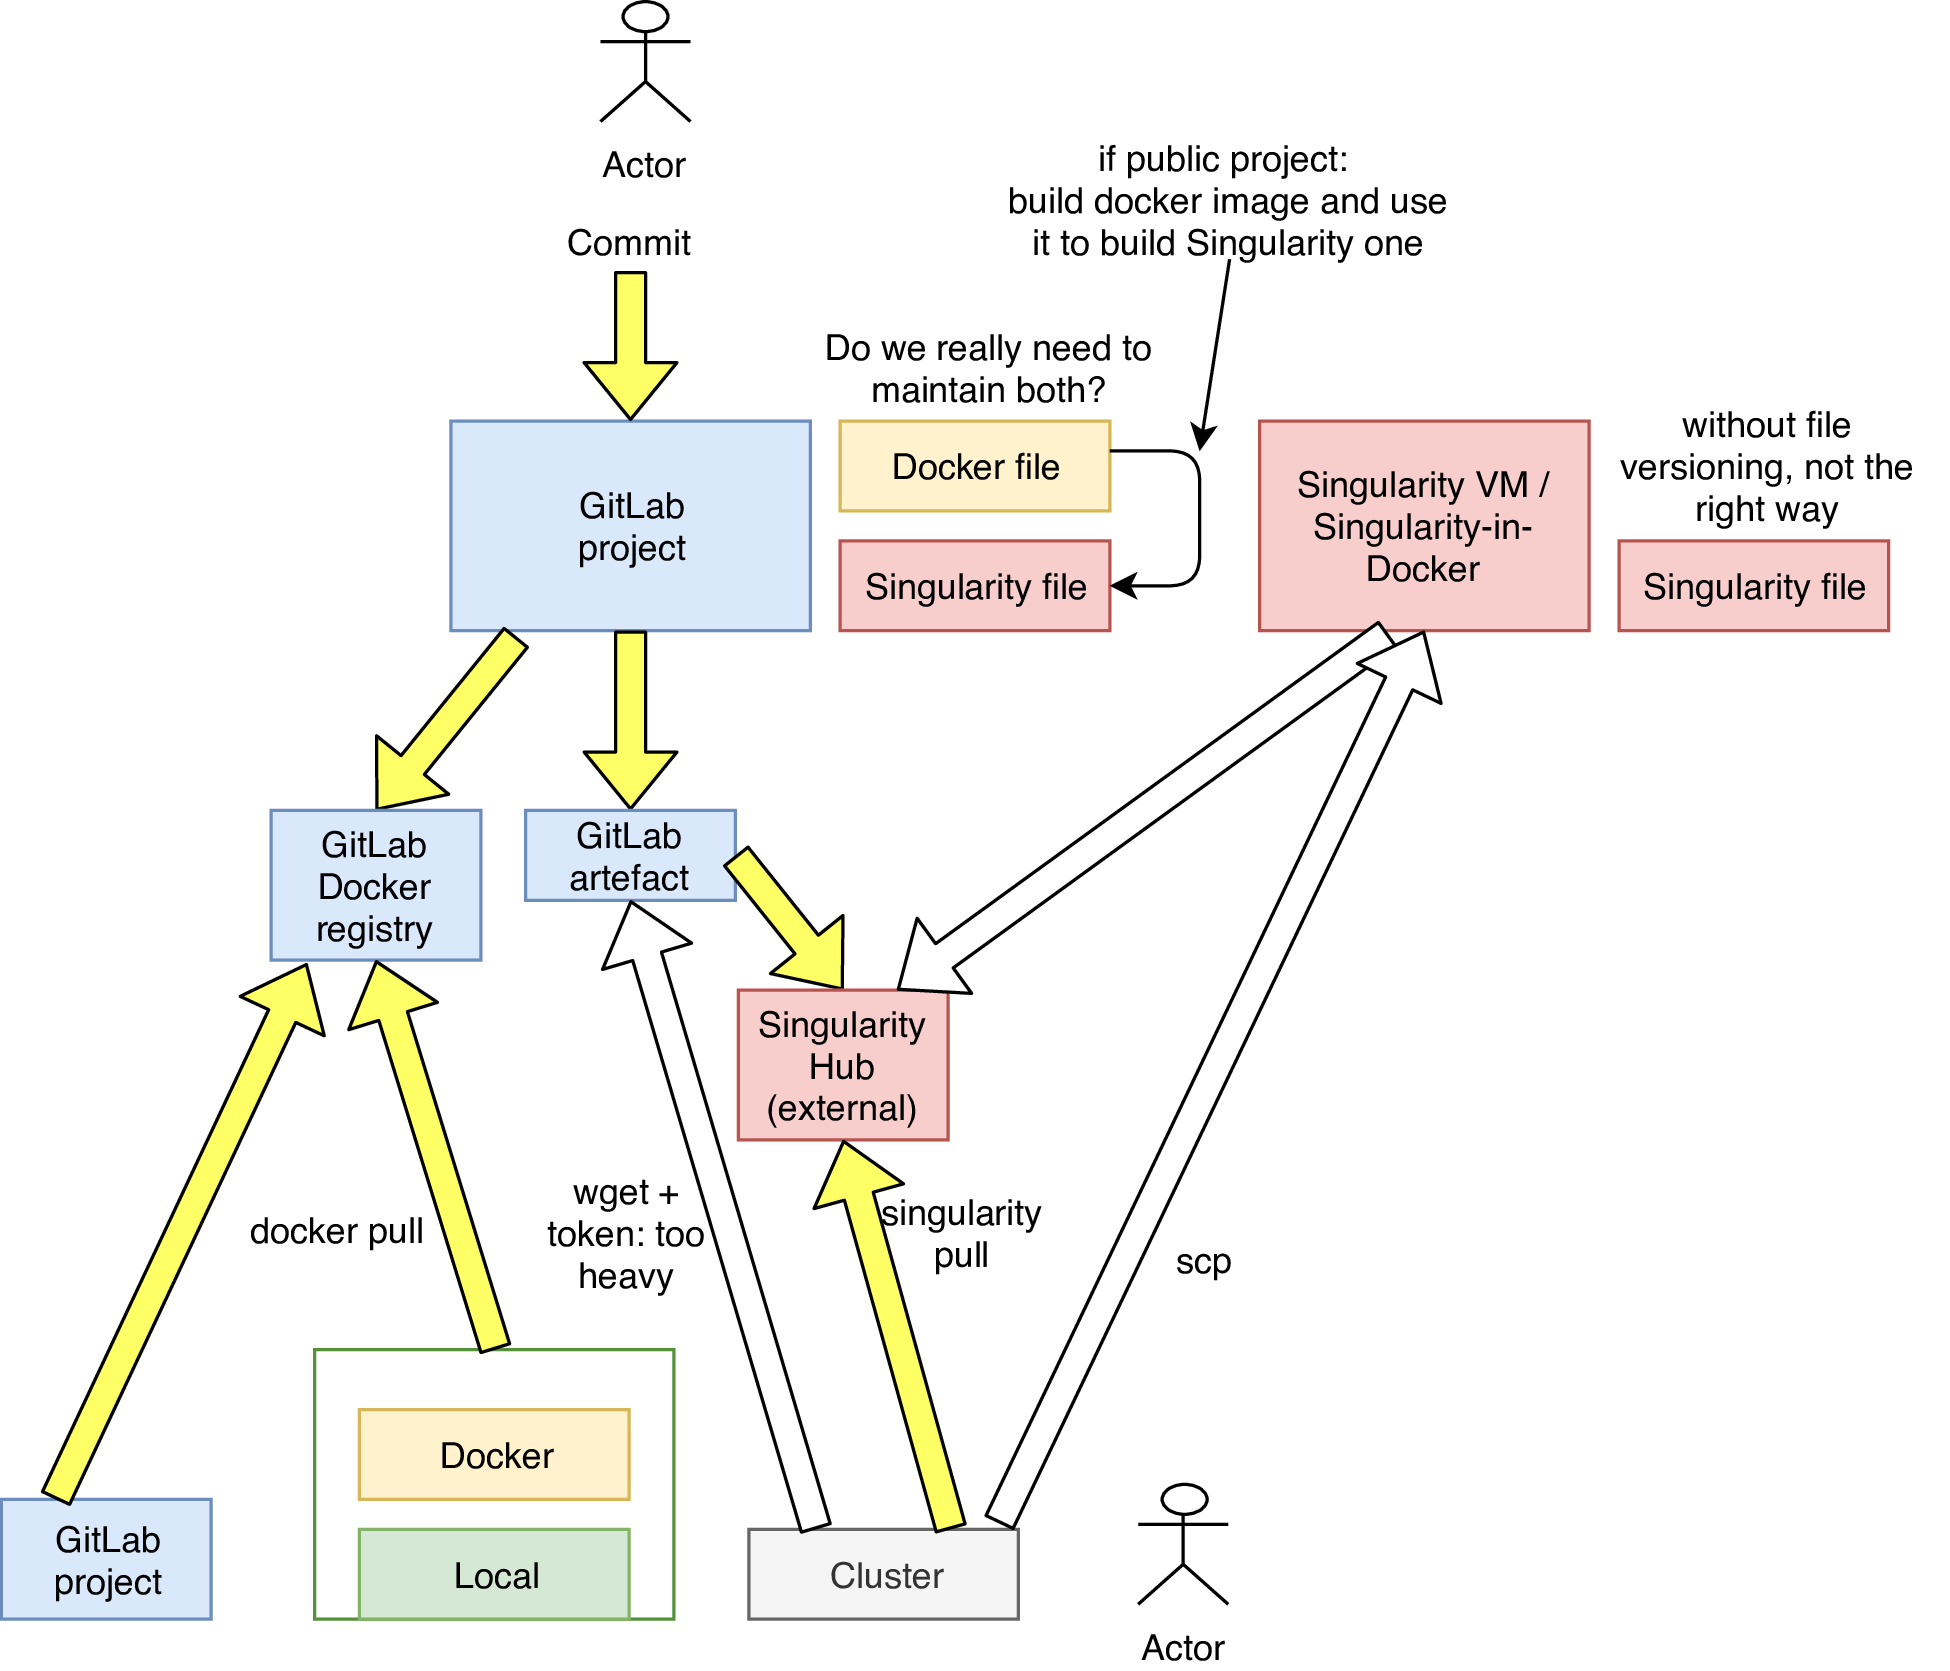
Singularity has to be used in three steps:
-
build a Singularity image from a Singularity file locally (Singularity for Linux user and Singularity-in-Docker for Mac user) or from the GitLab-CI as root user;
-
push the Singularity image on a Hub or a Registry;
-
execute a Singularity image on a computing cluster as normal user: APC cluster and CC-IN2P3 batch system.
Use Singularity
Locally with Singularity (Linux users)
For Linux users, see the tutorial of Martin of January 2018 for installing Singularity.
$ singularity --versionLocally with Singularity-in-Docker (Mac users)
For Mac users, use the Singularity client in a local Docker container.
-
Singularity v2.4.2 on CentOS (maintained by Cécile):
$ docker run -it --privileged -v $PWD:/img gitlab-registry.in2p3.fr/elisadpc/docker/singularity:2.4.2
$ singularity --version
This image is only maintained for GitLab Registry bootstrap method.
-
Singularity v2.6.1 + Sregistry client on Ubuntu (maintained by Martin):
$ docker run -it --privileged -v $PWD:/img sysmso/singularity-ci
$ cd /img
$ singularity --version
This Docker image is stored on the DockerHub.
If necessary, users can acces local files ($PWD) mounted in the container (/img) or install an editor:
$ apt-get update && apt-get install -y nano| Choose the image maintained by Martin! |
With GitLab-CI
See next section.
Build and push images
Bootstrap and build images
In order to build Singularity images, user need to be root in the local environment. Use several Singularity files with different bootstrap methods including the bootstrap tool (yum, docker…) and public/private Registries (local, Docker Hub, GitLab Registry, Singularity Hub (SHub)) and build the corresponding images.
| for Mac users, there is a bug with Singularity-in-Docker v2.6.1 when extracting Docker image from GitLab Registry, don’t worry it will be solved! Or you can use the v2.4.2 for this specific task. |
| the feature allowing to use the image from a GitLab Registry of a private project and from a private collection of the SHub does not exist in v2.6.1. |
-
Singularity file:
Bootstrap: docker
From: ubuntu:latest

%post
apt-get update && apt-get -y install wget build-essential
Bootstrap: localimage
From: /path/to/test.simg

%post
apt-get update && apt-get -y install curl
Bootstrap: docker
From: gitlab-registry.in2p3.fr/elisadpc/docker/ldc_env:master

%post
yum install -y wget build-essential
Bootstrap: shub
From: sregistry.in2p3.fr/computeops/ldc_env:latest

%post
yum install -y wget build-essential
-
Build images:
$ singularity build test.simg SingularityPush images
Push builded images on the Singularity Hub wich is an external service instanciated for the ComputeOps project and open to the IN2P3 laboratories.
| Singularity Hub is under development. |
-
Register on the SHub:
The ComputeOps SHub hosts the LISA collection of Singularity images. Go on the login page of the SHub and connect with the GitLab account. Join the LISA team.
-
Configure the credentials locally using the SRegistry token:
$ nano /root/.sregistry
{ "registry": { "token": "1234", "username": "user", "base": "https://sregistry.in2p3.fr" } }-
Push one of the images on the existing collection
tuto, with a relevant nametestand a specific tagv1(if the tag is not specified,latestwill be used):
$ sregistry push --name tuto/test:v1 test.simgWith GitLab-CI
Following the previous steps, use GitLab-CI to automatize the workflow. On an existing project or new one containing a Singularity file, add credentials and configure the GitLab-CI file.
-
Create a new project (
New project) with aREADME, add a fileSingularityand copy the content ofSingularity_docker. -
Add environement variables in the GitLab interface in
Projet/Settings/CI/CD/Variables:
SREGISTRY_HOSTNAME https://sregistry.in2p3.fr
SREGISTRY_TOKEN    1234
SREGISTRY_USERNAME user-
Add a YAML file
.gitlab-ci.yml:
stages:
  - build
  - push

build:
  image: sysmso/singularity-ci
  stage: build
  script:
    - singularity build test.simg Singularity
  artifacts:
    paths:
    - test.simg

push:
 image: sysmso/singularity-ci
 stage: push
 script:
  - source /sregistry_file
  - echo $SREGISTRY_FILE > ~/.sregistry
  - sregistry push test.simg --name tuto/test:v2
Use images
In order to use the previous image builded with GitLab-CI and stored on the SHub, pull, run, execute or shell them locally or on a computing center.
Locally
$ singularity pull shub://sregistry.in2p3.fr/tuto/test:v2
$ singularity run|exec|shell shub://sregistry.in2p3.fr/tuto/test:v2
You can also use images from others registries:
$ singularity run|exec|shell test.simg$ singularity run|exec|shell docker://centos:latest$ singularity run|exec|shell docker://gitlab-registry.in2p3.fr/elisadpc/docker/ldc_env:masterOn computing centers
On computing centers, users can not execute images as administrator (root) user. Furthemore, users need to use a scheduler in order to submit their jobs.
APC
Store the Singularity images on a repository with a sufficient capacity (/workdir), debug your image and execute it with a job submission script.
-
Store:
$ cd /workdir/user
$ singularity pull shub://sregistry.in2p3.fr/tuto/test:v2-
Debug mode:
Debug the Singularity image on a working node of the cluster with the interactive mode:
$ qsub -I
$ cd /workdir/user
$ singularity shell test.simg
If necessary, a queue can be selected in the interactive mode:
$ qsub -I -q quiet-
Job submission:
Launch a job by using a shell script. Remote storages (workdir@APC) have to be binded during the Singularity execution.
$ cat job_test.sh
#!/bin/bash
#PBS -N test
#PBS -o out_file
#PBS -e err_file
#PBS -q quiet
#PBS -M souchal@apc.in2p3.fr
#PBS -l nodes=1:ppn=4,mem=4gb,walltime=24:00:00
export SCRATCH="/scratch/$USER.$PBS_JOBID"
mpiexec -np 2 singularity exec -bind /workdir/user/:/code /workdir/user/test.simg python test.py
$ qsub job_test.sh
CC-IN2P3
-
Store:
Store Singularity images on SPS storage volume:
/sps/lisa...-
Debug mode:
$ qlogin
$ cd /sps/lisa/user
$ singularity shell test.simg-
Job submission:
/bin/singularity exec --bind /sps /sps/hep/lisaf/user/singularity.simg python test.py
$ qsub -q long -l os=cl7 run_singularity.sh
Use cases
MultiNest with MPI
Multinest container recipe
You can find the full recipe here : https://gitlab.in2p3.fr/souchal/singularity_multinest
The main goal here is to have a fully fonctional pymultinest environment configured with python, openMPI and multinest.
The file "pymultinest_demo_minimal.py" is just a demonstration that will be used to validate that the application is running correctly.
The first thing is to be sure that we use the same version of OpenMPI inside and outside the container. To check the version of OpenMPI you need, you have to run the following command on the cluster you want to use :
mpirun --version
mpirun (Open MPI) 2.1.1| Openmpi versions are not cross-compatible. You have to use same OpemMPI version inside and outside the container. |
Let’s see what’s inside our container :
Bootstrap: docker
From: centos:latest # We use CentOS 7

%files
pymultinest_demo_minimal.py /pymultinest_demo_minimal.py # We put the python test inside the container

%labels
AUTHOR souchal@apc.in2p3.fr
version 1.0

%environment
LD_LIBRARY_PATH=/usr/local/lib/ #This is the bootstrap environment, used to compile Multinest
export LD_LIBRARY_PATH

# After bootstraping the OS, we install compilation and development tools
%post
yum install -y gcc-c++ gcc-gfortran python-devel epel-release
yum install -y blas{,-devel} lapack{,-devel} atlas{,-devel}
yum groupinstall -y "Development Tools"

# Next we have to install the correct version of OpenMPI. The default CentOS packages are 1.10 :
#For openmpi 1.10
#yum install -y openmpi openmpi-devel

# Let's choose the 2.1 version that fit to our needs :
#For openmpi 2.1
rpm -ivh https://gitlab.in2p3.fr/souchal/openmpi-centos-build/-/jobs/artifacts/master/raw/openmpi-2.1.1-1.el7.x86_64.rpm?job=openmpi-2.1

# Some other tools we need to compile MultiNest
yum install -y python-pip cmake

# OpenMPI environment
export PATH=$PATH:/usr/lib64/openmpi/bin
echo "export PATH=$PATH:/usr/lib64/openmpi/bin" >> /environment
export LD_LIBRARY_PATH=$LD_LIBRARY_PATH:/usr/lib64/openmpi/lib:/usr/lib64/openmpi/lib/openmpi:/usr/local/lib
echo "export LD_LIBRARY_PATH=$LD_LIBRARY_PATH:/usr/lib64/openmpi/lib:/usr/lib64/openmpi/lib/openmpi:/usr/local/lib" >> /environment

# Here are the python requirements for PyMultinest :
pip install pymultinest
pip install numpy
pip install mpi4py

# We can compile MultiNest in a random folder :
mkdir /data
git clone https://github.com/JohannesBuchner/MultiNest.git
cd MultiNest/build/
cmake ..
make
make install
mkdir /scratch
chmod -R 777 /scratch

# The runscript is the action called when we type singularity run
%runscript
python /pymultinest_demo_minimal.py
Here we are ! We can now build the container, and run it with our file inside the container :
singularity build container.img Singularity
singularity run container.img
If everything works you should obtain the following result :
 *****************************************************
 MultiNest v3.10
 Copyright Farhan Feroz & Mike Hobson
 Release Jul 2015

 no. of live points =  400
 dimensionality =    2
 resuming from previous job
 *****************************************************
 Starting MultiNest
Acceptance Rate:                        0.613251
Replacements:                               3582
Total Samples:                              5841
Nested Sampling ln(Z):                235.741658
Importance Nested Sampling ln(Z):     236.107188 +/-  0.048935
 ln(ev)=   236.08866381514034      +/-  0.12107810019499939
 Total Likelihood Evaluations:         5841
 Sampling finished. Exiting MultiNest
The final test is to run the container with OpenMPI from the cluster :
mpirun -np 2 singularity run container.imgYou should have the same result.
To run your own code, you have to use the singularity exec command. For example, let’s run a file called "pymultinest_demo.py" located outside the container :
singularity exec container.img python ./pymultinest_demo.py